Recore Operation
As Reported by Incrediwagon
A full photo gallery of the operation can be seen at the link below. You must login to the external gallery to view at full size.
Recore Operation Gallery

This operation is a major one, and would be best handled by someone with experience. Abyss now has the facilities to do doll repairs. If that is not an option and you feel up to the task, than this is how I did a re-coring. It would also be helpful if you had someone to help move the doll. I had to make a rack to invert the doll, and that adds weight. Plus it needs to be suspended from something solid. So lets get started.
Dottie was in need of major work. The vagina and anus were to close together and over time split. The first thing to do is access the damage and the best way to fix the problem. It was obvious that a re-core kit from Abyss was needed. The instructions from Abyss differ from what I did but only in how the doll was elevated (you will see later) First thing is to clean the holes inside and out with MEK or Acetone. Next peal off the labia or cut with a razor blade if necessary. After cleaning the taint area again use the Abyss Adhesive on the split taint. Use sparingly. I had to hold the legs closed with a rope. Leave her to set over night.
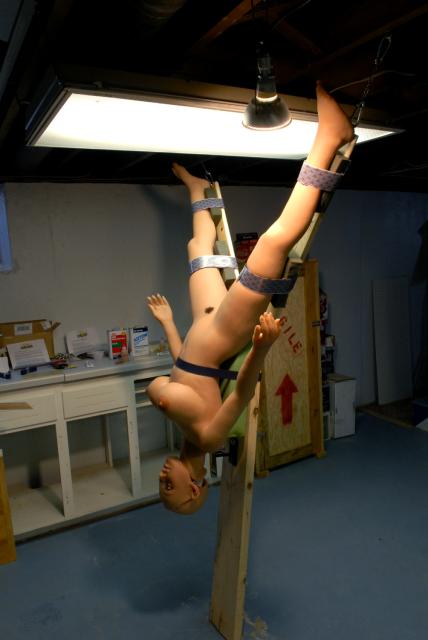
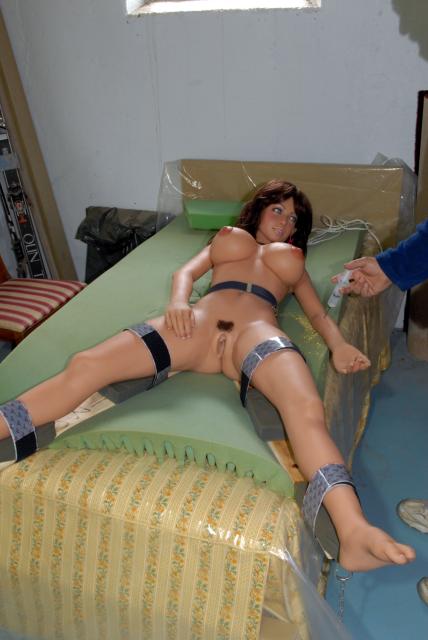
The next step involves making the torture device, which is made out of a 2x10 and a couple of 1x3. I used the neck bolt hanger that came with the crate and inverted it. At the tips of the Y I screwed in eye screws to attach the chains with corresponding eye bolts attached to the rafters. The Y is held together with carriage bolts. You also want the rack made so that it is at a good working height and good light. Strap the doll to the rack with a web belt around the waist and Velcro around the legs. Also use padding between the doll and the rack.
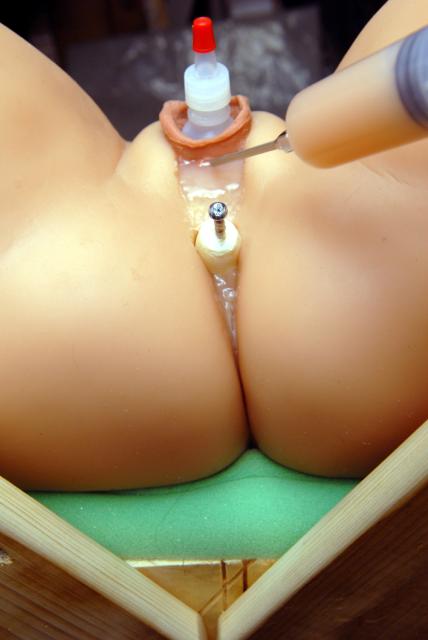
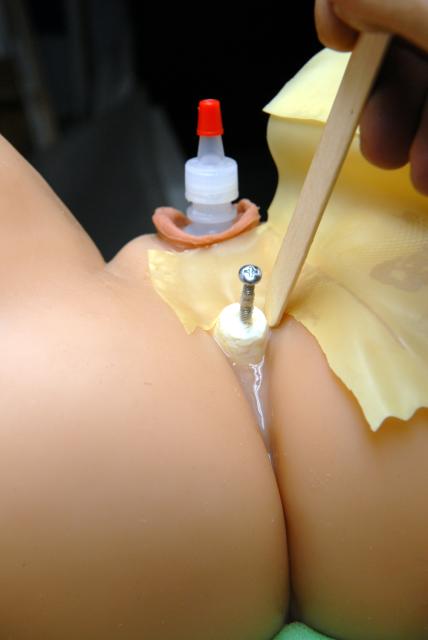
Now Dottie is ready to have her holes stuffed ;) You maybe able to see that not all of the taint stayed glued together. Not a problem. I used the adhesive to give a bit of strength, but will use the two part for filling.

Time to mix the silicone. Start by working the color by squeezing the bottle to mix it, then pore it into the mixing cup. I marked the catalyst bottle at the half way point so I only use half of part B to a whole bottle A. I also mark the catalyst bottle in quarters for mixing half of part A. I wouldn't mix any smaller. When stirring make sure you get into the corners of the cup. Also stir so as not to make a lot of bubbles.
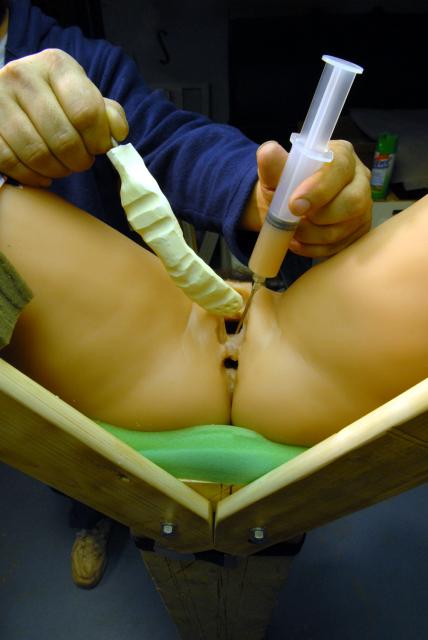
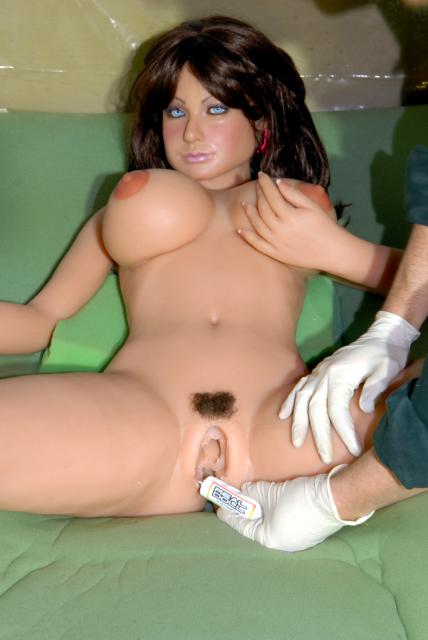
Fill a syringe, then inject the silicone deep and, coat the walls. After injecting about half of the syringe, slip in the vaginal core. The core has been soaped with dish washing liquid and left to dry a head of time. Next slip in the anal core. You could put that in first to stop the excess silicone from going in but I used the latex to stop the over flow, then put in the plug. The anal core is soaped too. Fill the area around, and between the cores, but only to the level of the old labia base. Let the mix set up a bit before adding more. Once the silicone sets up to the consistency of putty you can add some more and shape it with some soap on your finger.

I didn't make the taint to the finished height at this point. I will do that on a second pore. When done shaping let the silicone cure over night.
When you can pull all the silicone out of the cup stuck to the stick, it is time to lay her down. BUT DON"T PULL THE CORE YET. You will get an idea how silicone dries by working with it often. This batch was a very slow cure. I waited a week to pull these cores. I would wait a minimum of 48 hours. If it seem to set up in an hour. This batch didn't start to set for about six hours.
After the silicone has had time to cure totally it is time to pull just the vaginal core, do so by grasping the core and manipulating it out.
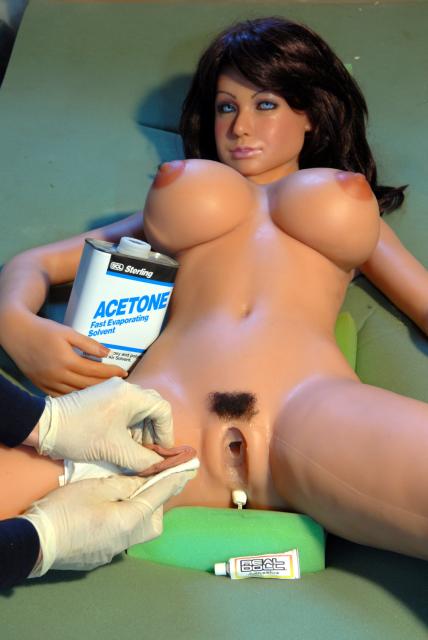
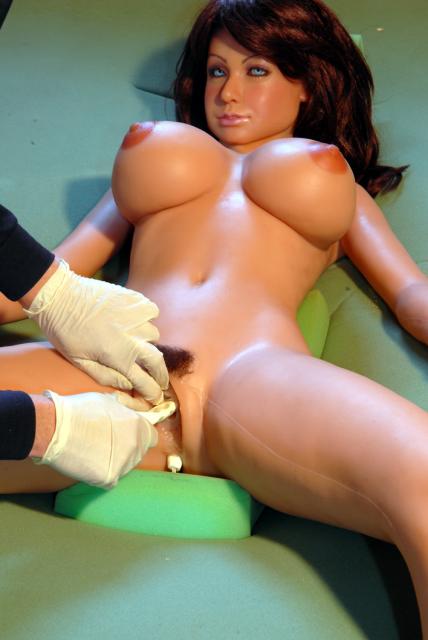
Now it is time to clean the soap from the whole area. First I washed with water. Then used the acetone. Next fit the labia opening to the vagina opening. In this case I cast the new vagina a little higher up so the lip opening doesn't quite line up naturally. By putting an old catalyst bottle in the vagina I can put the labia over it so the holes line up. I cleaned the labia and after dry fitting it found it did not need any trimming. The glue will pull it open, filling the outside of the labia. Apply the adhesive to the back side of the clitoris. Now the sides. Use just enough to coat the area. No need to lather it on. Also only glue the top and sides part way down the bottom part will be filled in with new silicone. Use T-pins to hold the top part of the labia in place. Start at the top to align. Then pin the sides. Make sure the lips are at the depth that you want. Don't worry if there is a gap inside. You can fill that area with more silicone. You don't want to fill that area with adhesive, because it is too hard and your pee pee won't like it ;) Now go back and fill any areas that didn't get glued. I used a nail and put a little bit on the tip. Fill the gap, then wipe the access if any. Wipe all the access adhesive off after it starts to set up so it won't be all shinny around the labia. Let the adhesive cure over night, and make sure the adhesive held. Then remove the T-pins.
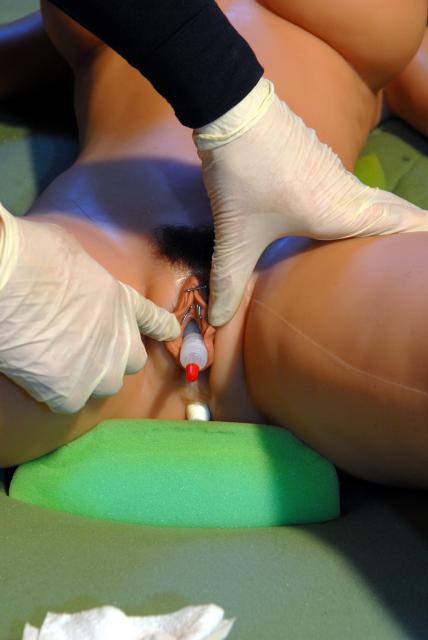
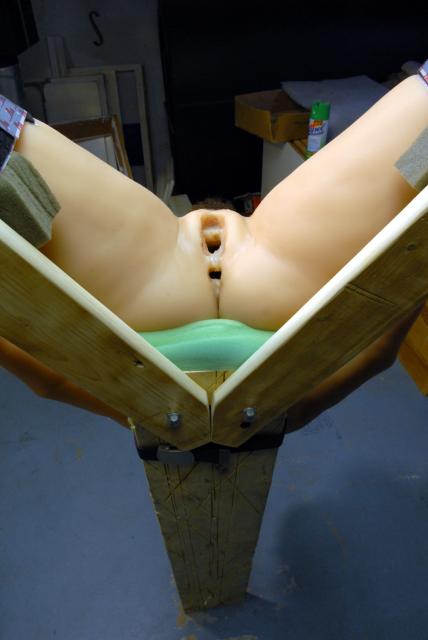
Time to head back to the rack for the final filling in of silicone. The taint area needs to be filled in with more silicone. In this case the bottle needed to be put back because the labia didn't meet up with the vagina opening. After mixing up a new batch of silicone, I filled in the sides a little more. Then fill in the rest, but just enough so that it doesn't run out. I found I had to add some blocks of wood to raise the rack . This will make the patient lean to make the taint level. Once the mix starts to thicken to almost paste like, it will be really hard for the silicone to come out of the syringe. It is time to finish filling in, do both sides of the anus.
Next we use a piece of latex glove with a thin coat of dry dish soap. Trim and fit the latex to the taint area when the mix is just about set. Start from a side, laying it down so as not to get air trapped. Work it across to get the air out. Push the air out in the corners with a tongue depressor, or mixing stick. This patch helps mold the silicone by making it smooth, and not shinny. Again wait over night to take the patch off, making sure the mix is cured. This second mix seemed to cure quicker and it is shallow so it was good over night. Once the patch and plugs are pulled, trim the holes with cuticle scissors.
Time now for a bath to wash out the soap. All done! and enjoy ;)

Disclaimer
CoverDoll has no affiliation with any of the above sites.
CoverDoll Publications takes no responsibility for any problems accruing in anyway or form what so ever, in any business transactions, loss of funds or loss of goods in transit, repair or modification etc, from any of the above sites that you may do business with.
© 1999-2009 CoverDoll digital publications


Comments
Nice explanation,...
G'day Everyone,..
Great re-core explanation,..
Only trouble is no pictures are showing,..
Not sure if it a problem at my end but Not seeing any pics here at this time.
Â
Playtime.
Â
Playing with Dolls is a Joy!
WARNING: The Dolls are starting to play Back!
Incedi.. Â Thanks for the
Incedi..
Â
Thanks for the info!
Â
Is the "re-core kit" from abyss different than just the silicon repair kit? I don't see anything on their website where you can order a "re-core kit".
Â
Also... where is the link to the photos?
Â
Thanks,
Hi Playtime, I think you
Hi Playtime,
I think you need to re-login. look at the upper right for your status.
Sorry I missed that
Sorry Playtime, I missed that in your reply. You must be both logged in at the external gallery and CoverDoll to see the photos. They are linked from the gallery album.
Kharn
CoverDoll Publisher
Link
Hi Soragesum, I will reply to this on behalf of Incredi as he is away on holiday.
I believe you can obtain a re-core kit from Abyss but it isn’t publicly shown. If you need one, I should get in touch and ask them.
On the gallery link, that is in the bar above marked Recore Gallery link. All you need do is click on that but I have put the link in this post as well ;) , /cdgalV2/main.php?g2_itemId=17523
I hope this helps my friend, but if you need anymore information, then just ask :) .
Kharn
CoverDoll Publisher
Hi Soragesum, Yes the kits
Hi Soragesum,
Yes the kits are different, but the only difference is the cores and labia. I talked to Abyss and ordered the core kit as part of the labia repair kit. It was about $100. with everything.
I also wanted to mention that when you go to the album, click on the picture, then click on the Details/Comments. I described what you are looking at in the picture in the comments. Plus you can look at the picture full size.
Dottie's Recore
Dottie and I Thank the Incredible Incred for an awesome job and making her better than new. I hope that Ceilidh gets her well deserved operation soon.